How to change an Amano MJR time clock ribbon
How to Change an Amano MJR7000 Ribbon
Replacing the ribbon in an Amano MJR7000 is straightforward if done carefully. Follow these steps to avoid damaging the printer assembly.
Step 1: Open the Clock
- Remove the front cover.
- Tip the keypad upward (it is hinged at the top).
- Use a pencil or similar object to gently hold the keypad up if needed.
Step 2: Advance the Ribbon
- Locate the black gear on the right side.
- Rotate it slightly to move the ribbon.
- Advance the ribbon approximately one inch to the right — no more.
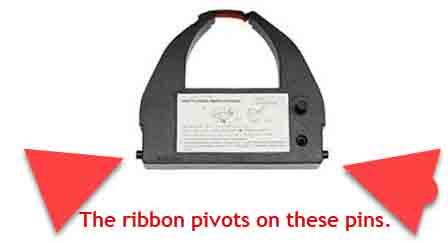
Step 3: Remove the Old Ribbon
- Grasp the sides of the ribbon cartridge.
- Tip the front upward and lift it out.
- The cartridge pivots on two molded pins inside the ribbon carrier.
- As it lifts, the ribbon will slide out from between the white printer guide and the metal ribbon shield.
Step 4: Install the New Ribbon
- Position the ribbon so it runs behind the metal ribbon shield and in front of the printer guide.
- Seat the cartridge back onto the pivot pins.
- Turn the ribbon advance knob to remove slack and ensure the ribbon is taut.
Step 5: Test the Installation
- Lower the keypad back into position.
- Locate the small white test button on the upper right of the motherboard.
- Press the button and observe the ribbon carriage moving smoothly left and right.
If the ribbon advances evenly and the carriage moves smoothly, installation is complete.
Need ribbons or time cards for your Amano MJR7000? Contact us for fast shipping and expert support.